Big SQL database restore appears to hang for a long time

This is a classic problem with big SQL database restore and regardless of the backup/recovery software you use, you will face the same problem.

What happens is before the actual restore takes place, SQL Server prepares the target database by creating the same set of files as before and initialize them by putting (lots of) zeros inside. The end result is a set of “container” files that have identical size as original but contain nothing until the actual data gets restored.

Depending on the original database size and destination disk’s speed, the process can take a very long time, sometimes longer than 24 hours. During this wait, anything can happen — server crashes, firewall cuts the connection, backup/recovery software cuts the connection and so on.

For example, this is what you see in NetBackup’s dbclient log on the target SQL Server:

20:17:56.727 [8500.8292] <4> readTarHeader: INF - requested filename </SQLTEST1.MSSQL7.SQLTEST1.db.MYDATABASE.~.7.004of004.20161204232656..C> matches returned filename </SQLTEST1.MSSQL7.SQLTEST1.db.MYDATABASE.~.7.004of004.20161204232656..C>
20:17:56.727 [8500.8292] <4> readTarHeader: INF - image to restore = 2153 GBytes + 95736624 Bytes
20:17:56.727 [8500.8292] <4> RestoreFileObjects: INF - returning STAT_SUCCESS
20:17:56.727 [8500.8292] <4> DBthreads::dbclient: INF - DBClient has opened for stripe <3>
.
20:19:03.707 [7180.7284] <4> StartupProcess: INF - Starting: <"C:\Program Files\Veritas\NetBackup\bin\progress" MSSQL>
20:19:12.594 [8500.5604] <4> bsa_JobKeepAliveThread: INF - sent 10 keep alives.
20:22:12.605 [8500.5604] <4> bsa_JobKeepAliveThread: INF - sent 10 keep alives.
20:25:12.618 [8500.5604] <4> bsa_JobKeepAliveThread: INF - sent 10 keep alives.
20:28:12.632 [8500.5604] <4> bsa_JobKeepAliveThread: INF - sent 10 keep alives.
20:31:12.647 [8500.5604] <4> bsa_JobKeepAliveThread: INF - sent 10 keep alives.
.
and it goes on until 24 hours later
.
20:31:20.089 [8500.5604] <4> bsa_JobKeepAliveThread: INF - sent 10 keep alives.
20:34:20.104 [8500.5604] <4> bsa_JobKeepAliveThread: INF - sent 10 keep alives.
20:36:21.938 [8500.8292] <4> VxBSAGetData: INF - entering GetData.
20:36:21.939 [8500.8736] <4> VxBSAGetData: INF - entering GetData.
20:36:21.939 [8500.7160] <4> VxBSAGetData: INF - entering GetData.
20:36:21.939 [8500.8292] <4> dbc_get: INF - reading 4194304 bytes
20:36:21.939 [8500.8736] <4> dbc_get: INF - reading 4194304 bytes
20:36:21.940 [8500.7160] <4> dbc_get: INF - reading 4194304 bytes
20:36:21.938 [8500.7368] <4> VxBSAGetData: INF - entering GetData.
20:36:21.943 [8500.8292] <4> readFromServer: entering readFromServer.
20:36:21.943 [8500.8736] <4> readFromServer: entering readFromServer.
20:36:21.943 [8500.7160] <4> readFromServer: entering readFromServer.
20:36:21.943 [8500.7368] <4> dbc_get: INF - reading 4194304 bytes
20:36:21.943 [8500.8292] <4> readFromServer: INF - reading 4194304 bytes
20:36:21.943 [8500.8736] <4> readFromServer: INF - reading 4194304 bytes
20:36:21.944 [8500.7160] <4> readFromServer: INF - reading 4194304 bytes
20:36:21.944 [8500.7368] <4> readFromServer: entering readFromServer.
20:36:21.944 [8500.8292] <2> readFromServer: begin recv -- try=1
20:36:21.944 [8500.8736] <2> readFromServer: begin recv -- try=1
20:36:21.944 [8500.7160] <2> readFromServer: begin recv -- try=1
20:36:21.944 [8500.7368] <4> readFromServer: INF - reading 4194304 bytes
20:36:21.944 [8500.7368] <2> readFromServer: begin recv -- try=1
20:36:21.947 [8500.8736] <2> readFromServer: begin recv -- try=1
20:36:21.947 [8500.7160] <2> readFromServer: begin recv -- try=1
20:36:21.950 [8500.7368] <2> readFromServer: begin recv -- try=1
20:36:21.951 [8500.8292] <2> readFromServer: begin recv -- try=1
20:36:21.955 [8500.8736] <2> readFromServer: begin recv -- try=1
20:36:21.957 [8500.8292] <2> readFromServer: begin recv -- try=1
20:36:21.958 [8500.8292] <2> readFromServer: begin recv -- try=1
20:36:21.959 [8500.8292] <2> readFromServer: begin recv -- try=1
20:36:21.959 [8500.8292] <16> readFromServer: ERR - recv() returned 0 while reading 4194304 bytes on 1340 socket
20:36:21.959 [8500.8292] <16> dbc_get: ERR - failed reading data from server, bytes read = -1
20:36:21.959 [8500.8292] <4> closeApi: entering closeApi.
20:36:21.959 [8500.8292] <4> closeApi: INF - EXIT STATUS 5: the restore failed to recover the requested files

In this case, the workaround is to by pass the “zeroing out” process. The steps are mentioned in https://docs.microsoft.com/en-us/sql/relational-databases/databases/database-instant-file-initialization.

NetBackup for SQL Admin Guide mentions it as well, though not as detailed.

NetBackup Appliance: update_clients script does not work even though client package has been installed correctly

NetBackup has a nifty script called update_clients to upgrade multiple clients at once. I wrote this technote a couple of years back to explain what it is and how it works.

Before you can use this script, the appropriate NetBackup client packages must be installed on the NetBackup Server (otherwise there is nothing to push).

For example: if you have a NetBackup Appliance server version 3.1, you can download the client packages from here then follow this procedure to copy and install the packages.

Now back to the issue mentioned earlier. To encounter that, you need a rather specific scenario:

  • Your NetBackup Server must be an Appliance,
  • The Appliance must already have NetBackup client packages installed,
  • The Appliance is then upgraded without removing the old client packages.

When you install a new client package in that scenario, the package will be symlinked incorrectly.

nb-appliance:/usr/openv/netbackup/client/Solaris # ls -l
total 12
lrwxrwxrwx 1 root root 101 Dec 7 13:43 Solaris -> /inst/client/.packages/NetBackup_8.1_CLIENTS/NBClients/anb/Clients/usr/openv/netbackup/client/Solaris
drwxr-xr-x 2 root bin 4096 Dec 7 13:02 Solaris10
drwxr-xr-x 2 root bin 4096 Dec 7 13:02 Solaris_x86_10_64

The correct one should be:

nb-appliance:/usr/openv/netbackup/client # ls -l
total 40
drwxr-xr-x 3 root bin 4096 Dec 7 17:11 HP-UX-IA64
drwxr-xr-x 5 root bin 4096 Jul 5 16:38 Linux
drwxr-xr-x 4 root bin 4096 Dec 7 17:11 Linux-s390x
drwxr-xr-x 3 root bin 4096 Dec 7 17:11 NDMP
drwxr-xr-x 3 root bin 4096 Dec 7 17:11 Novell
drwxr-xr-x 3 root bin 4096 Dec 7 17:11 OpenVMS
drwxr-xr-x 3 root bin 4096 Dec 7 17:11 RS6000
lrwxrwxrwx 1 root root 101 Dec 7 18:17 Solaris -> /inst/client/.packages/NetBackup_8.1_CLIENTS/NBClients/anb/Clients/usr/openv/netbackup/client/Solaris
drwxr-xr-x 14 root bin 4096 Dec 7 17:11 Windows-x64
drwxr-xr-x 8 root bin 4096 Dec 7 17:11 Windows-x86

To get the update_clients script to work, you will need to fix the symlink manually.

In my example, I would move out the existing /usr/openv/netbackup/client/Solaris:

mv /usr/openv/netbackup/client/Solaris /usr/openv/netbackup/client/Solaris_old

and create a fresh symlink:

ln -s /inst/client/.packages/NetBackup_8.1_CLIENTS/NBClients/anb/Clients/usr/openv/netbackup/client/Solaris /usr/openv/netbackup/client/Solaris

Hyper-V: Red Hat Enterprise Linux (RHEL) 7.4 OS ISO is not detected if Hyper-V guest is Generation 2

You may encounter this problem when installing RHEL as a guest VM on Hyper-V . In my case, my Hyper-V host sits on top of Windows 10 Enterprise 64-bit OS.

Windows Server 2016 OS ISO works just fine, however.

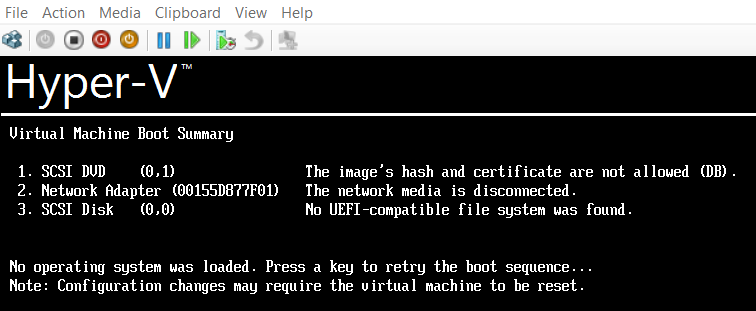
Error Message: No operating system was loaded. Press a key to retry the boot sequence…

4.png

Solution:

  1. Power off the VM.
  2. Right click the guest VM and select Settings…
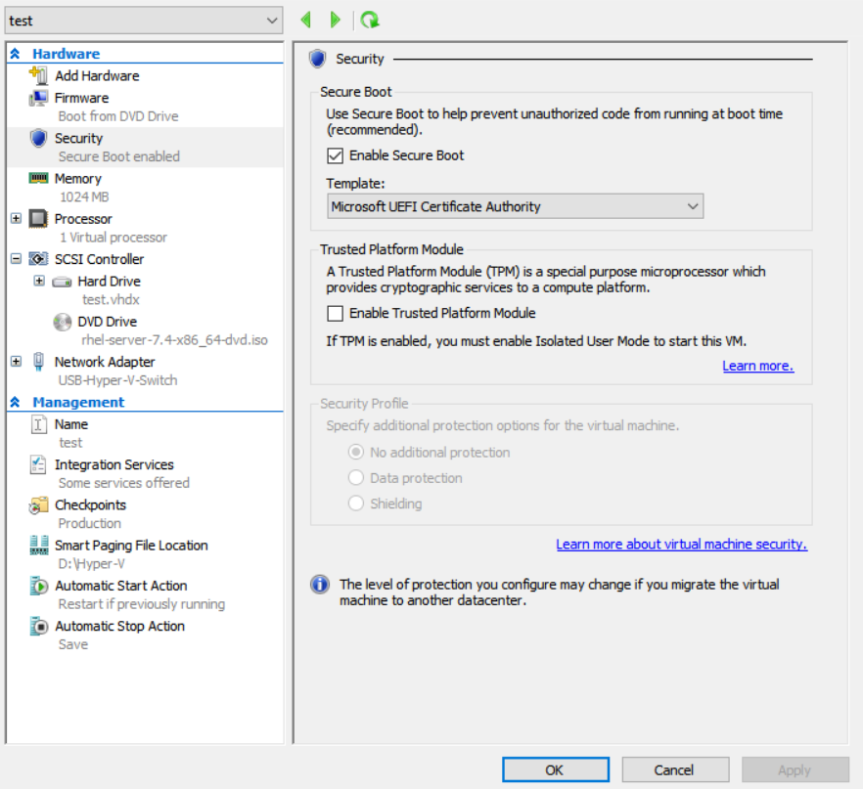
  3. Browse to Security and change the template to Microsoft UEFI Certificate Authority (alternatively untick Enable Secure Boot). Click OK then try powering on the VM again.

5.png


nbcertcmd -createtoken fails with EXIT STATUS 8000: User does not have permission(s) to perform the requested operation

I wanted to deploy a NetBackup 8.1 client the other day, and one of the steps involved entering a token from master server. My master server was a NetBackup Appliance running software version 3.1.

As per the procedure, I went to the master server and logged in to the NetBackup Web Management Console first:

bpnbat -login -logintype WEB

Afterwards, I ran the following command to generate the token:

nbcertcmd -createtoken -tokenname token_name

But it failed with: EXIT STATUS 8000: User does not have permission(s) to perform the requested operation, despite using “admin” account which had root privileges.

My colleague Hoai (who is a brilliant troubleshooter, by the way) suggested to create a NetBackupCLI account:

  • Go back to CLISH, and navigate to Main_Menu > Manage > NetBackupCLI
  • Run: Create myUser
  • You can change myUser to your user name.
  • Enter the password for your user twice.
  • Once created, log out and log back into the Appliance using the above account.
  • Re-run bpnbat and nbcertcmd commands, they should work.

The vnetd proxy encountered an error

You may encounter this error after adding a new NetBackup 8.1 client in the policy and trying to access it via Host Properties > Clients.

vnetd

One common reason for this error is the new client does not yet have a host ID-based certificate. Why is this so? Well, it could be an Administrator’s oversight during install process, especially if the install was automated using script – such as /usr/openv/netbackup/bin/install_client_files.

What you need to do is simple: deploy the client’s host ID-based certificate manually. The steps:

Go to master server and run:

/usr/openv/netbackup/bin/bpnbat -login -logintype WEB
/usr/openv/netbackup/bin/nbcertcmd -createToken -name token_name

NOTE: You can change the token_name. Once generated, copy the token string.

Now go to the client and run:

/usr/openv/netbackup/bin/nbcertcmd -getCertificate -host client_name -server netbackup -token

Replace client_name with the client’s hostname, and paste the token string when prompted.

Tips for analyzing large tcpdump output file

It is quite common for me to get a large* tcpdump output file to analyze.

WireShark has been my default tcpdump output file parser for a while, and I have absolutely no complain when working with small files. When the size exceeds 1GB though, I find the waiting time is unbearable – for me, at least.

My day-to-day workhorse is a Lenovo W530 i7 with 32GB RAM. With this spec, it takes WireShark at least 5 minutes to load a couple of GBs worth of tcpdump file. Expect similar wait time when I apply the filter.

Fortunately SplitCap came to the rescue!

It takes SplitCap a fraction the amount of time needed by WireShark to filter information. The only problem is its filter definition is not as powerful as the latter. “So why not combine the two?” I thought.

When I get a large tcpdump file these days I will parse it using SplitCap first, filtering only the IP addresses and ports I want. The resulting output will be much smaller and I can load it quickly in WireShark for more in-depth analysis.

* Large = a couple of Gigabytes.

Is your SQL Intelligent Policy backup being skipped randomly?

SQL Intelligent Policy was introduced in NetBackup version 7.7. Thanks to automatic registration of SQL Servers and their instances, it greatly reduces the time it takes to configure SQL backup. You don’t need to create backup scripts manually, either.

I have supported this feature for years now and I think it works really well, except for one minor annoyance: transaction log backups may be skipped randomly under specific condition.

That is, if you combine full, differential and transaction log schedules into one policy, you are asking for trouble. When full or differential backup runs, transaction log backup will not run. But wait, doesn’t Microsoft allow concurrent full/differential and transaction log backups? Indeed, they do.

To take advantage of backup concurrency, what you need to do is simple: Create 2 separate policies, one for full and differential backups, the other for transaction log backup. Don’t worry about the transaction log backup losing its link to the full backup, because NetBackup automatically links them together.

In fact, NetBackup for SQL Administrator’s Guide recommends separating the policies if you have high frequency SQL backups.

Backup jobs have completed but remain active indefinitely

When a backup job has completed, the job’s state should change to “done”. The NetBackup process responsible for updating job details is bpjobd. Besides interacting with Job Manager (nbjm), this process also interacts with NetBackup EMM database (NBDB). While uncommon, there can be occasions where aforementioned database is fragmented or has corrupt index.

If you notice random backup jobs completing but remain active indefinitely, it can be an indication of problem with the NBDB. In this scenario, ideally you would want to do some housekeeping jobs (procedure below) before calling Technical Support.

NBDB Housekeeping:

1. Confirm you have a good, recent full catalog backup.

2. Allocate a maintenance window, because you need to stop NetBackup processes.

3. Shutdown NetBackup:

/usr/openv/netbackup/bin/goodies/netbackup stop

If there are any stubborn processes, try running this to terminate them:

/usr/openv/netbackup/bin/bp.kill_all

4. Copy the content of /usr/openv/db/data/ to another location for a secondary backup.

5. Then start only Sybase database server:

/usr/openv/db/bin/nbdbms_start_server

6. Run a database rebuild:

/usr/openv/db/bin/nbdb_unload -rebuild -verbose
  • If no error, go to step 7.
  • If you do see an error, copy and paste the error message. Stop NetBackup services (netbackup stop), then move out the bad database set and put the old set (the one you copied earlier)

7. Once step 6 is completed, Validate NBDB content by running:

/usr/openv/db/bin/nbdb_admin -validate -full -verbose
  • Again — If no error, go to step 8.
  • If you do see an error, copy and paste the error message. Stop NetBackup services (netbackup stop), then move out the bad database set and put the old set (the one you copied earlier)

8. Compare the size of /usr/openv/db/data after rebuild, is it smaller than original? (you can check your original copy)

9. Stop NetBackup services again:

/usr/openv/netbackup/bin/goodies/netbackup stop

10. Then start all NetBackup services:

/usr/openv/netbackup/bin/goodies/netbackup start

11. Monitor the backups.

Clean way to reconfigure Fiber Transport Media Server (FTMS) on NetBackup Appliance 52xx and 53xx

NOTE: Please refer to my other post for FTMS on a BYO NetBackup Media Server.

While you can theoretically run the same FTMS commands on a NetBackup Appliance as its BYO siblings, you need to be careful with the former because it contains additional monitoring databases, scripts and reports.

The rule of thumb is if you can use CLISH to perform a task, utilize it instead of doing it manually through command line. It ensures the databases, scripts and reports stay in sync. This is especially true for FTMS configuration.

If you accidentally ran commands on your NetBackup Appliance that broke its FTMS configuration, you can follow below steps to reset it again.

NOTE: These steps will require reboots, so please allocate a maintenance window first.

1. Unplug all fiber channel cables from your Appliance. However, confirm beforehand that you only use the connections for FTMS, and not for any other purpose like disk array. If you have disk array connected, arrange with your SAN Admin to gracefully disconnect/unmount the disk array. If you have tape libraries attached, as long as no backups run then they are not used.

Don’t unplug the SAS cables that connect to the disk shelf if you have one.

2. Go to elevated prompt and run the following script to reset the FTMS setting (don’t forget the number 4 at the end):
sh /opt/NBUAppliance/scripts/fcr/clear_san.sh 4

** The appliance will reboot automatically once this step is complete **

3. Configure the SAN client again.
Log in to Appliance CLISH and go to Settings.

Run: FibreTransport SANClient Enable 4

** Once the wizard is completed, you will be prompted to reboot again **

5. After appliance is back, verify the FTM setting. Log back in to the CLISH and go to Settings.

Run: FibreTransport SANClient Show

Check the status. It should show: [Info] Fibre Transport Sever enabled.

Then go to Manage > FibreChannel

Run: Show

Check if there is any error. If all look good, you have your FTMS back. If not, it is best to contact NetBackup Technical Support.

How to check the command and switches being run by an active Windows process

Option 1:

  • Open Task Manager (simply right click an empty space on your task bar and select Task Manager)
  • Click Details tab
  • On the column header section, right click and choose Select columns.
  • Tick Command line and click OK.

Option 2:

  • Open Command window.
  • Run the following command:

Get-WmiObject win32_process -Filter "name like '%bpclntcmd.exe'"|select CreationDate,ProcessId,CommandLine|fl > c:\veritas_troubleshooting.txt</code>

Unfortunately you will need to know the executable name beforehand. In the above example, the executable is bpclntcmd.exe.